Do you ever spend time cleaning your windows, only to have them dry into a streaky, smudged mess? That frustrating result is almost a universal experience. But what if you could unlock a reliable, step-by-step process that works flawlessly, whether it’s a humid summer day or a freezing winter morning?
Welcome to the secret algorithm for streak-free windows. This isn’t just a list of tips—it’s a conditional, foolproof system used by professionals. By treating window cleaning like a precise formula, where your inputs (weather, tools, technique) determine your output (a crystal-clear view), you can achieve perfect shine every time. In this guide, you’ll learn the non-negotiable rules, the exact tools you need, and how to adjust your approach for any condition to get sparkling windows without the guesswork finally.
The Core Principles of the Streak-Free Algorithm
Before we dive into the steps, understand the three laws that govern streak-free success. Ignoring these is why most DIY attempts fail.
- Law of Dry Removal: The primary cause of streaks is solution or water left to dry on the glass. The goal is not to rub the window dry with a cloth, but to remove all liquid with your squeegee. Any remaining moisture is then quickly buffed away.
- Law of Clean Tools: A dirty tool will only redistribute grime. Your microfiber cloths must be clean, your squeegee blade must be sharp and free of nicks, and your water should be distilled if possible to prevent mineral deposits.
- Law of Conditional Logic: The weather is your main variable. You must adjust your solution and timing based on temperature and sunlight to counteract fast evaporation or freezing.
Step 1: Input Your Tools & Environment
Gathering the right tools is the first step in the algorithm. Using paper towels or a dirty rag guarantees failure.
Essential Hardware:
- A Quality Squeegee: This is the most important tool. A 10-12 inch squeegee with a sharp, replaceable rubber blade is ideal. Check the blade before you start; a nicked or worn blade will leave streaks.
- Microfiber Cloths: You need several—one for applying solution, one for wiping the squeegee blade after each pass, and one for final detailing and buffing edges. They are lint-free and highly absorbent.
- A Scrubber or Sponge: For applying your cleaning solution evenly across the glass.
- A Bucket: For your cleaning solution.
Environmental Scan (Your Key Variables):
- Temperature: Is it below 50°F (10°C), between 50-75°F (10-24°C), or above 75°F (24°C)?
- Sunlight: Is the sun directly hitting the window? This causes rapid drying and streaking.
- Window Condition: Are there hard water stains, paint splatters, or heavy grime? This requires pre-treatment.
Step 2: Execute the Core Cleaning Algorithm
This is the universal sequence. Follow these steps for every pane of glass.
Step 2.1: Pre-Clean & Dust Wipe down the window frame, sill, and tracks with a dry microfiber cloth. This prevents dirt from washing onto your clean glass.
Step 2.2: Apply Solution Evenly Using your scrubber dipped in your chosen solution (see Step 3 for recipes), wet the entire window pane. Cover it completely but avoid massive drips—a consistent, thin film is best.
Step 2.3: The Squeegee Pass (The “S” Technique) This is the heart of the squeegee technique. Professionals use an “S” pattern for efficiency, but a simple top-to-bottom method works perfectly.
- Start with the squeegee placed in the top corner, tilted at a 45-degree angle to the glass.
- Pull it across the top in one smooth, firm motion.
- Wipe the rubber blade clean with a dry microfiber cloth after every single pass.
- Overlap your next stroke by an inch and pull down again. Continue until the entire pane is cleared.
Step 2.4: Detail & Buff Run the tip of a dry, folded microfiber cloth along all four edges of the glass where the squeegee couldn’t reach. Finally, give the entire pane a quick once-over with a fresh cloth to catch any microscopic moisture and ensure a crystal clear finish.
Step 3: Adjust for Weather Conditions (The “If/Then” Logic)
This is where the algorithm adapts. Your base solution is 2 cups water, 1/4 cup white vinegar, and 1/2 teaspoon dish soap. Modify it based on your environmental scan.
| Condition | Problem | Algorithm Adjustment | Recommended Solution Mix |
|---|---|---|---|
| Cold (<50°F / 10°C) | Solution freezes or dries too slowly, causing streaks. | IF temp is low, THEN add alcohol and use warm water. Work on small sections quickly. | Base recipe + 2 tbsp rubbing alcohol. Use room-temp water. |
| Hot & Sunny (>75°F / 24°C) | Solution evaporates instantly, leaving residue. | IF in direct sun, THEN clean at dawn/dusk or work on the shaded side of the building. | Base recipe is fine. The key is to work on a cool, shaded pane. |
| Hard Water Stains | Mineral deposits don’t dissolve with normal cleaning. | IF stains are present, THEN pre-treat before core algorithm. | Spray with straight vinegar or a dedicated stain remover. Let dwell for 5-10 mins, then scrub before Step 2. |
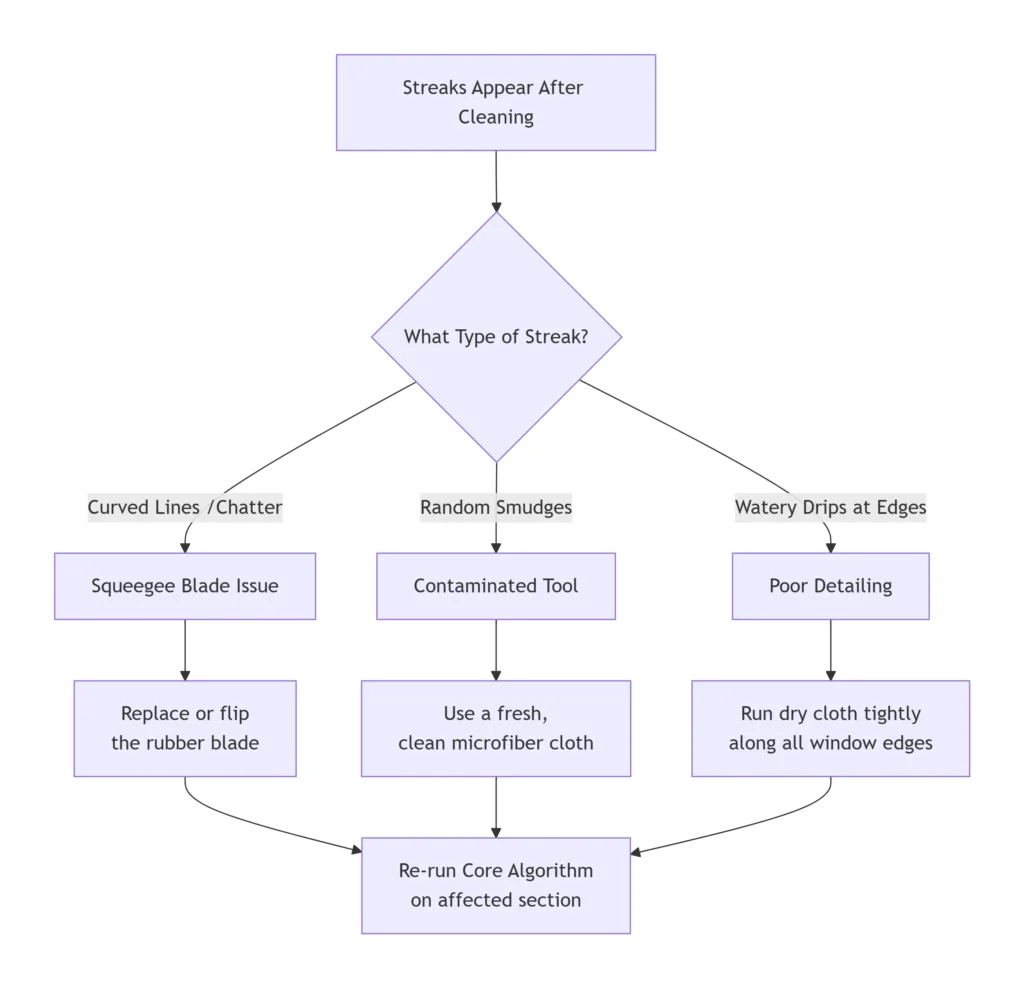
Step 4: Troubleshoot Outputs (Debugging Streaks)
If streaks appear, don’t start over. Diagnose the issue using this flowchart.
Pro-Tips from the Professionals
- Work Top to Bottom: Always clean the highest windows first to avoid drips on clean lower ones.
- Invest in an Extension Pole: For second-story windows, a pole attachment for your squeegee is safer and more effective than a ladder.
- The Final Inspection: Always step back and look at the window from an angle in the light. This reveals streaks you can’t see head-on.
Achieving streak-free windows isn’t about magic; it’s about method. By following this clear algorithm—preparing your tools, executing the core squeegee technique, adjusting logically for weather, and troubleshooting outputs—you turn a frustrating chore into a satisfying, guaranteed success. The perfect shine is now a repeatable formula.
Your Clear Next Step: Don’t try to clean all your windows at once. This weekend, pick one window that frustrates you the most. Gather your tools, check the temperature, mix the correct solution, and run the algorithm. Once you see that single pane turn crystal clear, you’ll have the confidence to scale up to every window in your home.


